
The weather is cooling off, the leaves are starting to turn and the smell of bonfires are in the air. Best of all, it’s almost Halloween!
We’ve created some pool-themed pumpkin templates to make sure your favorite sport is represented in your jack-o-lantern! You can download them below!
Download Bats & 9-Ball Template
Download Zombie 8-Ball Template
Before turning these templates over to you, we had to test them first – somebody had to right!? Read below to get some great hints and tips for carving your poolplayer pumpkins!
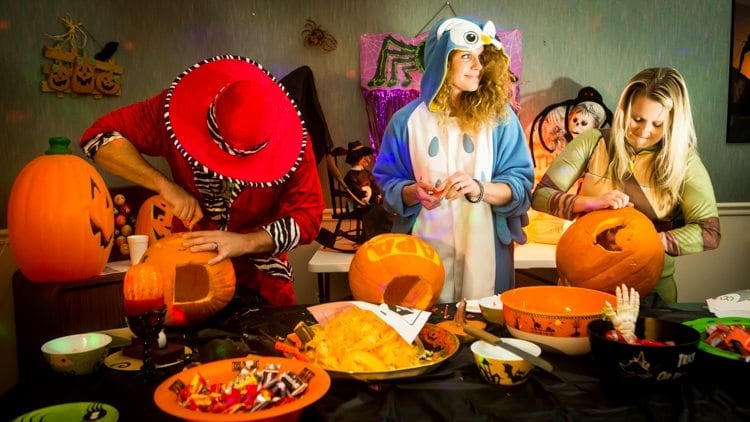
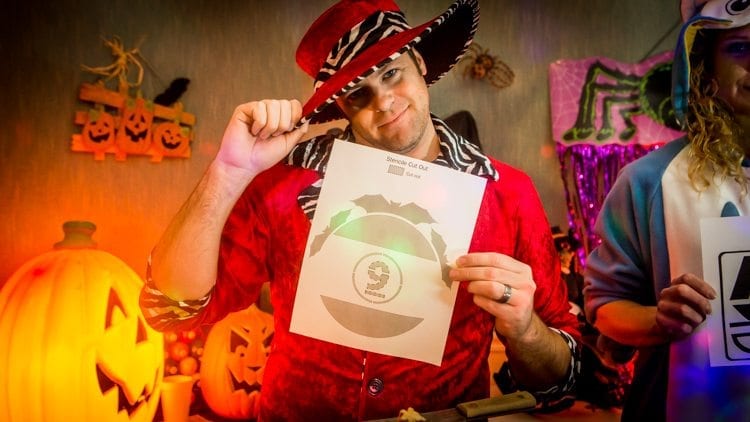
Difficulty Level 1 – Here’s Jason’s story!
I hadn’t carved a pumpkin since I was a kid, and to be honest, I’d forgotten about how gross cleaning out the pumpkin is! Nevertheless, I was on a mission to carve the best pool-themed pumpkin of the group!
I cut a hole in the top and started to dig in. I quickly realized two things:
1) I cut the hole too small on top, making it difficult to maneuver when cleaning out the pumpkin.
2) It’s important to have a nice large spoon with a decent grip to clean it out. Initially I was using a plastic pumpkin carving tool that just wasn’t as effective.
I opted to try the 9-Ball with bats around it as I thought it’d be the simplest of all the designs, and I think it definitely was. I started by using a small pin to poke little holes around the stencil lines and then used those dots as cutting lines for my carving tool. I began by cutting out the bats first, and then focused on the 9-Ball. If I did it again, I’d probably start with the 9-Ball first, and work my way from the center outward.
One of the flaws in the stencil was that the bats were too close to the 9-Ball portion of the design. This allowed very little room for error and left some very thin areas of separation on the pumpkin. I’d recommend carving the 9-Ball first, and then going back and placing your bats at least a ½ inch outside of that part of the design.
Overall, I was happy with how the design turned out and I think you will be too – good luck!
Download Bats & 9-Ball Template!

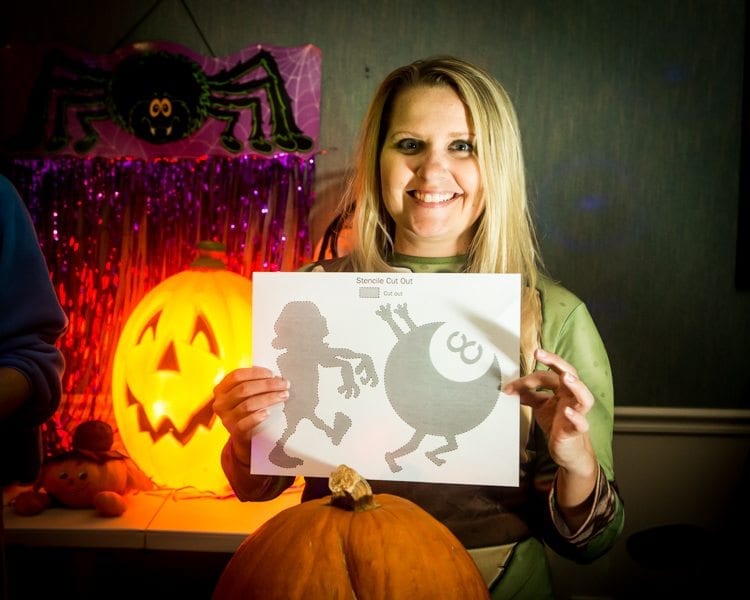
Difficulty Level 2 – Here’s Becky’s story!
Hey all! So, I was assigned the zombie chasing the 8-Ball pumpkin stencil. It seemed pretty simple (I’m not the most artistic), so I was stoked to give it a shot. First off, I cut the hole in the top of the pumpkin much too small…oops! Luckily, I have kiddie sized hands, so it wasn’t a huge deal, but if you’ve got hands bigger than that of a 10-year-old, I’d recommend making the hole in the top of the pumpkin plenty big so you can get the gunk out with no problems.
After the fun part (getting the gunk out…oh and making sure you save the seeds!), it was time to get my outline done. I used one of those little plastic poker pins that you get with a pumpkin carving kit at the store and made small holes all the way around the stencil so that I had a good outline to cut out. The carving was pretty self-explanatory on this one, just be careful that you don’t cut out the 8-Ball and get left with a gaping hole. I ended up just scraping the 8-Ball.
So, there you go! If I can do it, so can you! Happy carving!
P.S. – Make sure you save those seeds and cook them! Clean them off good using a colander (get all that orange gunk out) and dry them with a paper towel. Spray a cookie sheet with cooking spray and spread the seeds on the cookie sheet. Add some melted butter or olive oil (I prefer butter) and salt (or whatever combo of spices you like!). Roast for about 35-45 minutes at 300 degrees, flipping them occasionally. Enjoy!
Download Zombie 8-Ball Template!

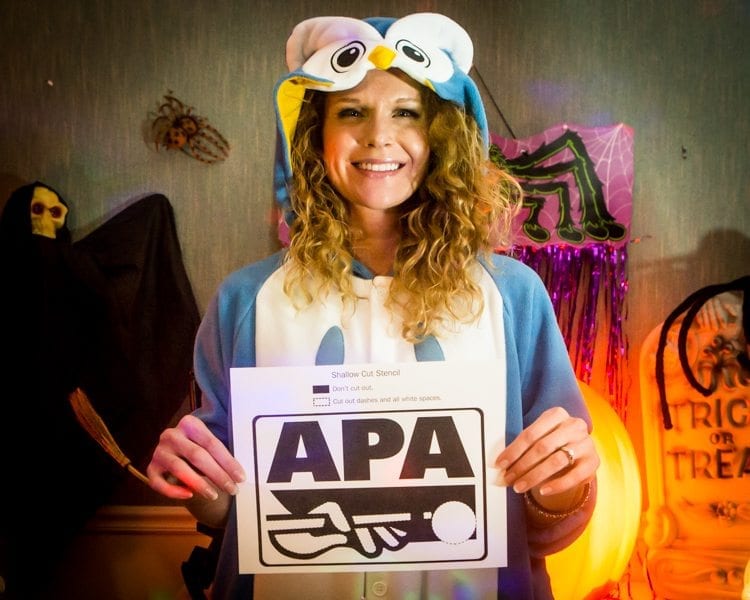
Difficulty Level 3 – Here’s Kellie’s story!
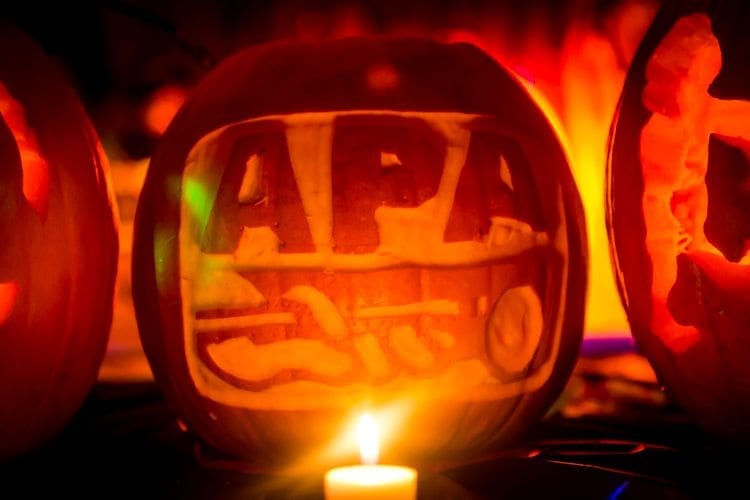
Hi Everyone! I wanted to try the APA logo–I’ve never done a shallow cut/surface carving before on a pumpkin and I LOVE the APA! This was a fun challenge!!
You will need:
- Large knife to cut the top of the pumpkin
- Scraper
- Surface pumpkin carving kit (includes a round, square, and triangle tip)
I started by cutting a hole in the top with the blade angled in towards the center so that the top would sit on the top once hollowed. (Cut off the bottom instead if using electric lights) Next, take the scraper tool and scoop out all of the seeds and scrape the inner walls until the inside of the pumpkin is smooth. Make it clean enough that light will shine through the design when complete.
Take the APA logo stencil and trace the design by poking holes with a needle tool or poker pen. Tip! Poke holes on the inside of the shallow cut areas so that when you carve off those sections your guideline-holes will be removed. Pay attention to where you poke the holes so when the stencil is removed you can see what is meant to be cut out. I poked holes in the corners of the letters and in certain angles of the hand to keep close track of these sections.
When you’re ready to cut, use the square or round surface carving tool and carve the outline of the rectangle that goes around the outside of the logo. Next, carve out the letters – “A’s” first using the triangle point and square point for the corresponding angles, then the “P”. Tip I learned a bit late: Use short strokes with the surface carving tools; this helps keep control of the tool and avoids cutting areas you had not intended to cut.
After completing the “APA” letters, I worked on all of the white around the hand, cue, and ball until I could start to see how the cue and fingers were going to need to be cut. Use the round surface carving tool for the ball and fingers. And that’s it – you have an awesome APA pumpkin! Take it to League night and submit your photos through Instagram and Facebook!!
Download APA Logo Template!
Well, there you have it! We hope you enjoy the templates and the tips and tricks included here help you!
